Disclaimer: This post is written by me, but I used AI to help me clean up grammar mistakes.
There are lots of reasons why you might not want a split keyboard yet: you're not sure if you'd like it, it's too expensive, or it's troublesome to carry around every day. Don't worry, I've got you covered — I'll help you set up your laptop keyboard (or any regular keyboard) to be as ergonomic as possible. In this post, we'll discuss the philosophy of keymapping rather than the specifics of any particular software. If you're interested in the actual setup steps, stay tuned — that post is coming.
Physical Layout
Here is the keyboard layout I usually use:
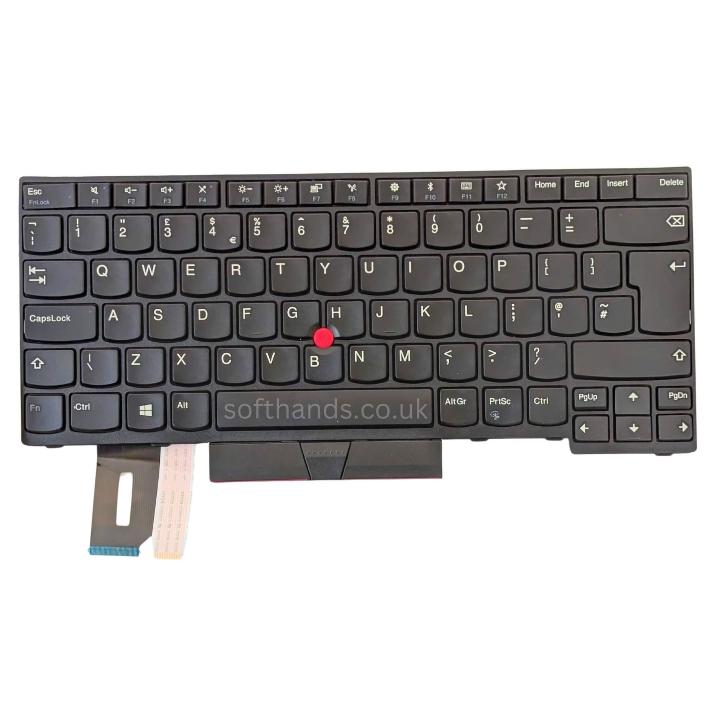
One thing to note: this keyboard is in the UK layout (with the `\` key next to Z). This choice just makes it a bit easier to remap the keys later; you can still apply everything in this post to your regular US layout.
And here is how I mapped it:
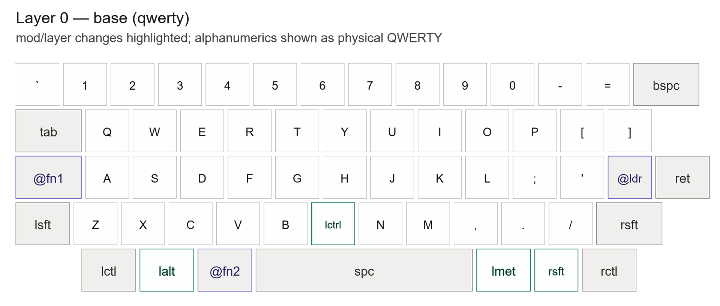
The first thing to note is that I took advantage of the `\` key and shifted the entire left half of the bottom row one key over: `Z -> \`, `X -> Z`, `C -> X`, `V -> C`, `B -> V`. The right half of this row is kept unchanged.
The reason for this is that if we follow the traditional typing guideline shown in this diagram, the left hand always leans to the right, creating a very unnatural posture.
Naturally, our hands form a triangle, and by shifting one key over, our left hand can comfortably type the correct characters in a natural position (the pinky can now press `Z` without shifting the whole hand).
We freed up one key in the original `B` position. You can put anything you like there — I personally put `Left Control` there, but it doesn't matter much.
If you're using a US layout, you can use tap-hold and put `Z` on the `Shift` key: when held, it acts as `Shift`; when tapped, it outputs `Z`.
Putting layers to work
Now that we have the correct posture, let's shift our focus to layers.
Navigation layer:
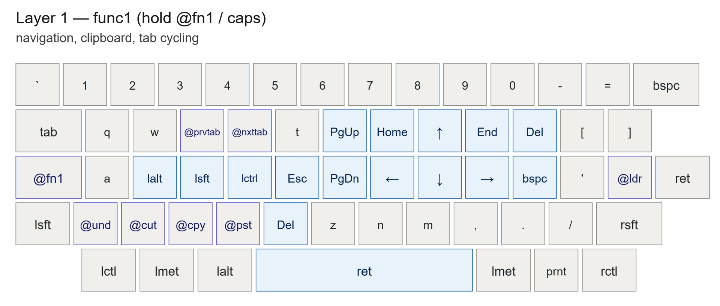
This is what I call the Navigation layer.
The idea is simple:
- The layer is activated with the Caps Lock key.
- Right hand
- Navigation keys sit right under your right hand (intuitive, since you're already used to the arrow cluster with your right hand).
- `Delete` and `Backspace` are right under the pinky — you can press them without moving your hand.
- `Home` and `End`: we normally don't use these keys much because they're far away, but once you put them here, they're very nice to use. Jumping to the start or end of a line while typing becomes so much easier.
- `Page Up` and `Page Down` are also right there. They're not very useful on their own, but with a few clever tricks, you'll see how powerful they can be.
- Left Hand
- Modifier keys are placed on the home row of the left hand so you can combine them with right-hand keys for powerful movements, such as:
- `Ctrl + Left`: Move back one word
- `Ctrl + Right`: Move forward one word
- `Ctrl + Delete`: Delete forward one word
- `Ctrl + Backspace`: Delete backward one word
- `Ctrl + Shift + {Left, Right}`: Select one word {backward, forward}
- `Ctrl + {Up, Down}`: Move up/down one paragraph
- `Ctrl + Shift + {Up, Down}`: Select one paragraph up/down
- `Undo, Cut, Copy, Paste` are at their traditional positions, but now you press them with `fn1+{Z, X, C, V}`. This is more ergonomic than `Ctrl+{Z, X, C, V}`, where you have to contort your hand.
- `Esc` is also on the home row — if you use Vim, this makes getting out of Insert mode much easier.
- `@prvtab` and `@nxttab` are macros that send `Ctrl+PageUp` and `Ctrl+PageDown`: switching to the left or right tab in your browser (and VS Code, and other apps that support it).
- `Return/Enter` is on the `Spacebar`. Pressing Enter this way is very satisfying.
Number and Symbol layer
Here is my number and symbol layer:
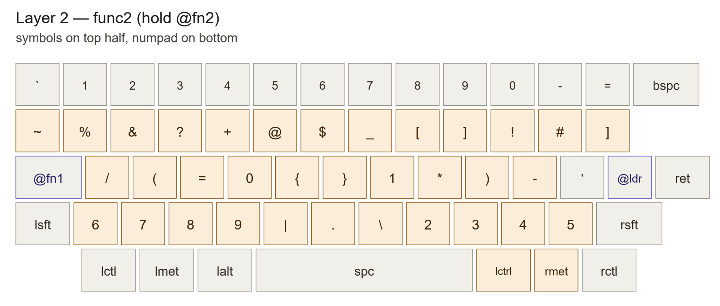
This layer is fairly straightforward. It can be activated by `@fn2`, which sits next to the spacebar. (Normally I put this directly on the spacebar using tap-hold, but a dedicated key is better for beginners — even I, after years of using tap-hold, still trip up with it from time to time.)
Theory:
- The most frequently typed digits should be the easiest to reach: `0` and `1`. This is much better than placing 1 and 0 at opposite ends of the number row.
- All important symbols should be the easiest to type: curly brackets, square brackets, parentheses.
- I didn't do it in this example, but I often put the function row (`F1`–`F12`) where the number row sits in this layer, so you can press function keys fairly easily too.
Summary
This is a fairly standard layout I've been using for years, both on laptop keyboards and ergonomic keyboards. I hope this helps you get familiar with advanced keyboard features and eventually make the move to split keyboards.